
Baking School In-Depth: Buttermilk Bar Doughnuts
Behold, the buttermilk bar! A favorite in doughnut shops across Los Angeles, California, buttermilk bars first rose to popularity in the 1960s and ’70s. Basically unheard of across the rest of the country, these doughnuts are crisp and golden on the outside and fluffy on the inside, similar in taste to a classic old-fashioned doughnut but shaped into a slightly more substantial bar and enriched with tangy buttermilk. For this month’s Baking School In-Depth, we’ll show you every step of the process, from mixing your dough to frying your doughnuts, all with the best kitchen tools. Click here to download a printable PDF of this lesson, or keep scrolling to view our digital lesson.

Join us Monday, June 27, 2022 at 8pm, EST for our Baking School In-Depth class! Brian Hart Hoffman will be teaching all things buttermilk bar. He will be taking an in-depth look at these delicious doughnuts, showing you every step of the process, from mixing the dough and frying it, to taking the leftovers and turning them into a delicious Fourth of July treat! Register here!
Ingredient Breakdown
Great recipes require great ingredients. Here’s how each of our recipe’s simple ingredients contributes to making the very best buttermilk bar doughnuts.
Granulated sugar: Beaten with eggs at the very beginning of this recipe, granulated sugar does more than just add sweetness. Whipping together the sugar and eggs helps to yield fluffy, lofty doughnuts while also ensuring a melt-in-the-mouth interior. The sugar also caramelizes as the doughnuts fry, creating a crisp and golden exterior.
Light brown sugar: Brown sugar is known for its ability to bring richness and moisture to baked goods, and these doughnuts are no exception. Brown sugar contains molasses (about 10% molasses for light brown sugar and 20% for dark brown sugar), which means added moisture and more caramel like flavor in every bite.
Eggs: Eggs provide moisture in our dough while also enriching and tenderizing the doughnuts. Eggs also act as a leavening agent in the dough, trapping and protecting the air bubbles created when the eggs and sugar are beaten together. During baking, the egg emulsion keeps these air bubbles from collapsing, helping the batter fry into fluffy, craggy doughnuts.
Unsalted butter: Melted butter serves to enrich dough, creating moist, tender doughnuts. It also assists in aerating the dough, as the fat in the butter helps retain the gases released (steam and carbon dioxide) during baking. Melted butter also incorporates more smoothly and evenly in wetter doughs, ensuring a consistently richer flavor and texture.
Vanilla extract: Vanilla is the secret weapon for baked goods, adding depth of flavor. A dash of high-quality vanilla gives baked treats a multidimensional upgrade.
Lemon zest: Citrus peel contains hundreds of tiny pores packed with essential oils. Once unleashed, they provide concentrated aroma and flavor. A little bit of lemon zest goes a long way in baked goods.
All-purpose flour: For the delicate crumb of this cakey doughnut, a special flour that balances between soft and hard is needed. All-purpose wheat flour has a protein content of 10% to 12%, so our doughnuts are tender but have enough gluten structure to form a rich crumb that’ll hold together.
Unbleached cake flour: Cake flour is ground extra-fine and has a low gluten content, which results in a lighter-structured crumb and fluffy texture. Cake flour keeps our doughnuts from becoming dense while still helping to provide structure to hold the dough together.
Baking powder: Comprised of baking soda, powdered acid or acids, and a starch, most baking powders are double-acting, meaning the reaction occurs twice, using two different acids. The first is a very quick reaction that occurs when baking powder is combined with a liquid, aerating the batter. The second reaction is slower-acting, occurring when heated.
Kosher salt: Kosher salt has a pure, clean flavor because it doesn’t contain iodine or minerals. When it comes to salt, one important thing to note is that salt granules come in different sizes and densities, so be sure to weigh your salt for the most accurate measure.
Whole buttermilk: What’s a buttermilk bar without buttermilk? The acidity in buttermilk combined with the fat content courtesy of its whole milk base works as the ultimate tenderizing ingredient. Buttermilk brings signature tang, and the acidity also plays a key role in softening the gluten found in the flour, creating a beautifully fluffy doughnut.
All-vegetable shortening & Vegetable or canola oil: A combination of equal parts shortening and oil makes for the ideal frying environment. Foods fried in a saturated fat, like shortening, don’t feel oily in your mouth because their fats become solid when cooled. Foods fried in oils absorb more of the fat because they stay in liquid form, even after being allowed to cool and set, resulting in an oily, greasy feel. By combining the two, the doughnuts don’t absorb as much oil when frying and avoid an oily exterior even after cooling. Vegetable and canola oil are both light in color, have a high smoke point, and are relatively flavorless, providing the perfect base. Meanwhile, shortening is the secret to a crispier, golden outer crust on your doughnuts.

Tools of the Trade
Frying can be fickle, but with the right tools, delicious homemade doughnuts are easier than ever
Enamel-coated cast-iron Dutch oven: Dutch ovens are ideal for deep-frying because of the unmatched heat distribution and retention of cast iron. They keep the oil temperature even and consistent, even when frying multiple doughnuts at once. Plus, the enameled coating makes them incredibly easy to clean. We used a 5.5-quart Le Creuset Round Dutch Oven, available at williams-sonoma.com.
Thermometer: A candy or deep-fry thermometer will be essential in monitoring the temperature of your oil. Slight fluctuations in temperature are to be expected, but oil that’s too hot will cook the exterior of your doughnuts faster than the interior, resulting in a potentially burnt exterior or raw interior. Too low and your doughnuts won’t form an outer crust fast enough to prevent oil from soaking into your dough. Only a thermometer can keep track and make sure your oil stays at a steady 365°F (185°C).
Ruler: To make our doughnuts as consistently sized as possible, we use a ruler to measure out and divide each doughnut into an even size. The closer the doughnuts are in size, the more evenly they’ll fry, meaning you won’t be left with some doughnuts cooking faster or slower than others in the batch.
Fish spatula: It may sound strange, but trust us. These delicate doughnuts can be perfectly cradled and placed in the oil using a fish spatula. Basically an elongated version of the standard slotted spatula, fish spatulas are specifically designed for shimmying underneath delicate fillets. Unlike a spider spatula, which your dough might snag on, or a standard slotted spatula that doesn’t have the same control, the fish spatula is long enough to put distance between your hand and the hot oil but short enough to easily maneuver when it comes time to turn your doughnuts and remove them from the fryer.
Baking sheet & wire rack: This duo makes a great team for cooling and glazing your doughnuts. Lined with paper towels, a baking sheet is the perfect place to let your doughnuts cool and drain excess oil. And after you’ve dipped your doughnuts in the Lemon Glaze, a wire rack is the ultimate place to allow excess glaze to drip off your doughnuts while they set and cool.

Buttermilk Bar Doughnuts
Similar in taste and texture to an old-fashioned doughnut but with the added tang of buttermilk and a luscious Lemon Glaze, these Buttermilk Bar Doughnuts are a California classic we couldn’t resist re-creating. Complete with a craggy top and fluffy, cakey interior, these bars are the bigger and—dare we say—better version of the common ring-shaped favorite.
- ⅓ cup (67 grams) granulated sugar
- ¼ cup (55 grams) firmly packed light brown sugar
- 2 large eggs (100 grams), room temperature
- 2 tablespoons (28 grams) unsalted butter, melted and cooled for 5 minutes
- 2 teaspoons (8 grams) vanilla extract
- 1 teaspoon (3 grams) tightly packed lemon zest
- 2 cups (250 grams) all-purpose flour
- ⅔ cup (83 grams) unbleached cake flour
- 1 tablespoon (15 grams) baking powder
- 1 teaspoon (3 grams) kosher salt
- ¾ cup (180 grams) whole buttermilk, room temperature
- 4 cups (768 grams) all-vegetable shortening
- 4 cups (896 grams) vegetable or canola oil
- Lemon Glaze (recipe follows)
- In the bowl of a stand mixer fitted with the paddle attachment, beat sugars and eggs at medium speed until lightened in color and well combined, 2 to 3 minutes, stopping to scrape sides of bowl. Add melted butter, vanilla, and lemon zest; beat until well combined, about 1 minute.
- In a medium bowl, whisk together flours, baking powder, and salt. With mixer on low speed, add flour mixture to sugar mixture alternately with buttermilk, beginning and ending with flour mixture, beating just until smooth and combined after each addition, stopping to scrape sides of bowl. Place in another medium bowl; cover and refrigerate overnight.
- In a 5½ -quart enamel-coated cast-iron Dutch oven, melt shortening with oil over medium heat; heat until a deep-fry thermometer registers 365°F (185°C). Line a large rimmed baking sheet with paper towels.
- On a heavily floured piece of parchment paper, roll or pat dough into a 9-inch square (about ½-inch thickness), flouring rolling pin or hands as needed. Using a floured chef’s knife, cut dough into 3-inch columns, separating as you cut them. (Columns will start sticking back together if not separated.) Place 1 column on a heavily floured surface. (Refrigerate remaining columns on a piece of parchment paper.) Cut column into 3×1½-inch rectangles. Using the tip of the floured knife, score lengthwise down center of each rectangle, making sure not to cut all the way through.
- Using a fish spatula, lift dough rectangles, one at a time, and place, scored side up, in hot oil. (If dough turns in the oil, use spatula to turn it back over.) Working in batches*, fry doughnuts until deep golden brown, 1½ to 2 minutes per side. Remove from oil, and let drain on prepared pan. Repeat cutting and frying with remaining dough.
- Dip tops of doughnuts into Lemon Glaze, letting excess drip off. Place on a wire rack, and let stand until glaze dries. Serve warm or at room temperature.
- 1½ cups (180 grams) confectioners’ sugar
- 3 tablespoons (45 grams) water
- 1 teaspoon (3 grams) tightly packed lemon zest
- In a small bowl, whisk together confectioners’ sugar, 3 tablespoons (45 grams) water, and lemon zest until smooth and fluid. Use immediately.
Bringing Together Your Buttermilk Bar Dough
Quick to come together in a stand mixer, this dough is surprisingly simple yet decadent


1. In the bowl of a stand mixer fitted with the paddle attachment, beat sugars and eggs at medium speed until lightened in color and well combined, 2 to 3 minutes, stopping to scrape sides of bowl. Add melted butter, vanilla, and lemon zest; beat until well combined, about 1 minute.
2. In a medium bowl, whisk together flours, baking powder, and salt. With mixer on low speed, add flour mixture to sugar mixture alternately with buttermilk, beginning and ending with flour mixture, beating just until smooth and combined after each addition, stopping to scrape sides of bowl. Place in another medium bowl; cover and refrigerate overnight. Refrigerating your dough overnight gives it time to set up, making it easier to work with the next day. Without this overnight refrigeration, the dough will be too sticky and difficult to work with.
3. In a 5½-quart enamel-coated cast-iron Dutch oven, melt shortening with oil over medium heat; heat until a deep-fry thermometer registers 365°F (185°C). Line a large rimmed baking sheet with paper towels.
Cutting and Shaping Your Bars
Cut into bars instead of being shaped into rings, these doughnuts come together with only a few quick measurements and cuts


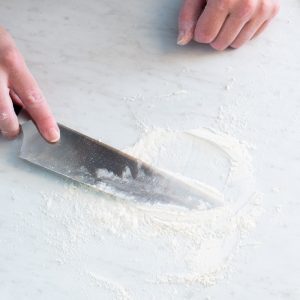

1. On a heavily floured piece of parchment paper, roll or pat dough into a 9-inch square (about ½-inch thickness), flouring rolling pin or hands as needed. Using a floured chef’s knife, cut dough into 3-inch columns, separating as you cut them. (Columns will start sticking back together if not separated.) Place 1 column on a heavily floured surface. (Refrigerate remaining columns on a piece of parchment paper.) Cut column into 3×1½-inch rectangles. Using the tip of the floured knife, score lengthwise down center of each rectangle, making sure not to cut all the way through.
Fry Like a Pro
Though frying may feel daunting, working in batches makes the task more manageable, and utilizing the right equipment makes transferring your doughnuts seamless and simple


1. Using a fish spatula, lift dough rectangles, one at a time, and place, scored side up, in hot oil. (If dough turns in the oil, use spatula to turn it back over.) Working in batches, fry doughnuts until deep golden brown, 1½ to 2 minutes per side. Remove from oil, and let drain on prepared pan. Repeat cutting and frying with remaining dough. These doughnuts are small enough that you can fry up to 6 at a time if you’re comfortable. And if you’re worried that your doughnuts aren’t fully cooked, you can temp them when you think they’re done. An internal temperature ranging from 205°F (96°C) to 210°F (99°C) means they’re done, but avoid testing too often, as oil will seep into the hole poked by the probe.
Get Your Glaze On!
Simple, sweet, and lemony, this glaze comes together in seconds and adds the perfect citrusy kick to these cakey doughnuts


1. In a small bowl, whisk together confectioners’ sugar, 3 tablespoons (45 grams) water, and lemon zest until smooth and fluid. Use immediately.
 2. Dip tops of doughnuts into Lemon Glaze, letting excess drip off. Place on a wire rack, and let stand until glaze dries. Serve warm or at room temperature.
The post Baking School In-Depth: Buttermilk Bar Doughnuts appeared first on Bake from Scratch.